Aug 5, 2014
为什么Linux内核(目前)依赖GCC
最近围绕着Linux内核编译环境发生了很多有趣的事情. 先是LLVMLinux的[1]大批特性进入mainline, 内核几乎可以用Clang编译了[2], 后来又是Linus Torvalds狂喷GCC 4.9.0[3], 很有意思. 而这些事情都有一个共同的背景: 目前Linux内核编译依赖GCC. 那么, 为什么?
不通用的命令参数
Linux内核使用了很多GCC的命令参数来进行优化, 其它编译器也一直在试图兼容, 但目前尚未有能完美兼容GCC参数的其它编译器出现.
不支持的内联汇编
__asm__ 并不被其它编译器全面支持, 或者所支持的架构平台有限, 即使是如此简单的用法:
asm("movl %ecx, %eax");
特殊的C语言扩展
GCC支持很多独有的特殊C扩展, 例如绑定变量与寄存器, 函数嵌套等, 此外大多数其它编译器也不支持结构体中的变长数组, 但是内核中存在, 例如:
void func(int i) {
	struct foo_t {
		char a[i];
	} foo;
}
特殊的段标记
内核中使用了很多段标记例如__refdata, __initdata和__exitdata来优化链接器的行为, 这些特性大多也是GCC独有.
#define __refdata       __section(.ref.data)
#define __initdata      __section(.init.data)
#define __exitdata      __section(.exit.data)
GCC的特殊行为或者bug
有时候GCC的某个行为是特殊的甚至是错误的, 但是却恰好迎合了某段代码的需要. 例如IA-64平台上GCC会自动重读一个指向volatile数据的指针的指向内容[4].
ref:
1, http://llvm.linuxfoundation.org
2, http://www.phoronix.com/scan.php?page=news_item&px=MTY2MjY
3, http://www.phoronix.com/scan.php?page=news_item&px=MTc1MDQ
4, https://software.intel.com/en-us/articles/intel-c-compiler-for-linux-kernel-building
Apr 7, 2014
MSI under Linux
什么是MSI
MSI(Message Signaled Interrupts)是一种中断形式, 依靠设备将约定数据写入指定地址来通知CPU中断的产生.
MSI从PCI 2.2开始支持, 在PCI 3.0中得到扩展. 支持更多中断以及拥有独立配置各个中断能力的MSI-X则从PCI 3.0开始被支持.
MSI的优点
相对基于引脚的中断响应方式, 首先MSI支持更多的中断且不需要复用, 其次启用MSI的设备的数据写入和中断触发是串行的, 驱动接收到中断信号的时候就可以确定数据已经准备就绪, 而不需要检查相应设备的寄存器, 这提升了性能.
如何在Linux下使用MSI
PCI设备默认以基于引脚的中断响应方式初始化, 然后由驱动来检测是否支持MSI并决定是否启用, 如果启用MSI失败则会回退到基于引脚的中断响应方式. 下面是关于MSI的几个重要的内核函数:
启用MSI并给设备分配一个中断:
int pci_enable_msi(struct pci_dev *dev)
允许驱动申请minvec至maxvec个中断:
int pci_enable_msi_range(struct pci_dev *dev, int minvec, int maxvec)
获取设备申请的中断向量个数:
int pci_msi_vec_count(struct pci_dev *dev)
禁用MSI, 回退到基于引脚的中断响应方式:
void pci_disable_msi(struct pci_dev *dev)
ref:
1, https://en.wikipedia.org/wiki/Message_Signaled_Interrupts
2, https://www.kernel.org/doc/Documentation/PCI/MSI-HOWTO.txt
Apr 2, 2014
What is dentry
dentry, 既directory entry的缩写, 是Linux VFS中用来管理树状目录的结构, 在内存中生成, 并不存在于实际的文件系统中.
dentry的结构
dentry结构的定义(linux/include/dcache.h)如下:
struct dentry {
        /* RCU lookup touched fields */
        unsigned int d_flags;           /* protected by d_lock */
        seqcount_t d_seq;               /* per dentry seqlock */
        struct hlist_bl_node d_hash;    /* lookup hash list */
        struct dentry *d_parent;        /* parent directory */
        struct qstr d_name;
        struct inode *d_inode;          /* Where the name belongs to - NULL is
                                         * negative */
        unsigned char d_iname[DNAME_INLINE_LEN];        /* small names */

        /* Ref lookup also touches following */
        struct lockref d_lockref;       /* per-dentry lock and refcount */
        const struct dentry_operations *d_op;
        struct super_block *d_sb;       /* The root of the dentry tree */
        unsigned long d_time;           /* used by d_revalidate */
        void *d_fsdata;                 /* fs-specific data */

        struct list_head d_lru;         /* LRU list */
        /*
         * d_child and d_rcu can share memory
         */
        union {
                struct list_head d_child;       /* child of parent list */
                struct rcu_head d_rcu;
        } d_u;
        struct list_head d_subdirs;     /* our children */
        struct hlist_node d_alias;      /* inode alias list */
};
这其中比较基本和重要的成员是d_parent, d_child, d_name和d_inode, 分别用来记录上级目录, 下级成员(如果当前dentry为目录文件), 文件名以及所指向的inode.
dentry如何形成树状结构
区别于记录文件数据的inode, dentry只用来记录文件的组织和管理信息. 路径就是由多个dentry连接而成的, 例如/home/user/foo路径中的根目录/, 目录home, 目录user和文件foo各自都是一个dentry结构. 所有的dentry索引起来就形成了文件系统的树状结构.
Dec 31, 2013
Why can't vmlinux be booted
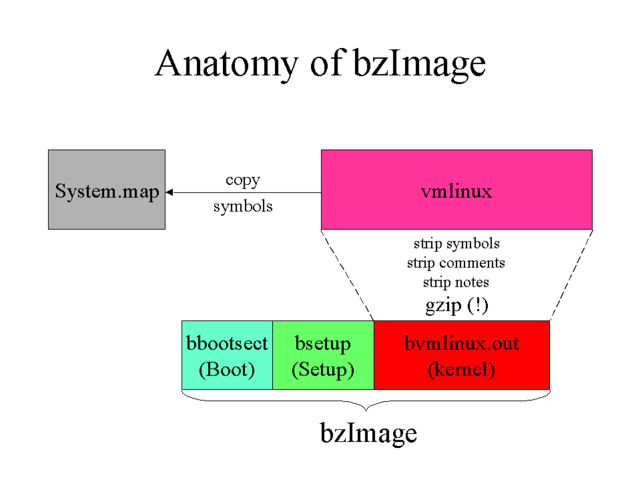
In short, because vmlinux is only the image of bare kernel, which is running after system booted.
ref:
Nov 9, 2013
jiffies和NO_HZ
Linux内核中很多事件都是时间驱动的, 通俗讲就是动作的发生都要以时间为条件, 例如延迟, 定时以及周期执行等.
jiffies
为了让内核能够感知时间, 硬件提供了时钟发生器, 它可以被编程以某个固定频率自行触发时间中断, 然后内核藉由中断服务程序来处理时间驱动的事件. 时钟发生器的频率就是HZ, 意味着时钟发生器每HZ分之一秒产生一个节拍, 而自系统启动以来产生的总节拍数就是全局变量jiffies.
jiffies变量的类型是unsigned long, 如果体系结构为32位, 时钟频率为1000, 这个变量大概50天后就会溢出. 所以使用jiffies的关键是不要直接进行比较而要使用内核提供的宏, 例如:
<linux/jiffies.h>
#define time_after(a,b) ...
#define time_before(a,b) ...
#define time_in_range(a,b,c) ...
NO_HZ
回过来说HZ, 它的值应该被设定为多少呢? 频率低了的话, 精度不够, 影响整个系统的实时性; 频率高虽然能提高精度和实时性, 但又会造成系统负担过重, 大量的时间被用来处理时钟中断服务程序. 而且由于使用场景的不同, HZ并没有一个通用的理想值, 内核的默认值也曾多次改变.
为了兼顾实时性和能耗, 内核从2.6.17开始引入了tickless的特性, 也被称为NO_HZ. 发展到现在(3.10之后, 目前3.12), 内核为此功能提供了三个选项:
- CONFIG_HZ_PERIODIC, 每个节拍都不会被忽略.
- CONFIG_NO_HZ_IDLE, 默认设置, 节拍在空闲的CPU上会被忽略.
- CONFIG_NO_HZ_FULL, 节拍在空闲的或者只有一个可执行任务的CPU上会被忽略.
之所以默认启用是因为tickless有着立竿见影的好处, 省电和降低负载, 尤其是在移动, 虚拟化和高性能运算等环境下.
ref:
1, https://lwn.net/Articles/549580/
2, https://www.kernel.org/doc/Documentation/timers
Jun 26, 2013
用Kprobes调试内核
Kprobes是一种运行时动态调试内核的机制, 你可以用它设置断点并收集调试信息, 甚至改变内核行为.
Kprobes分三种, 普通kprobes以及基于普通kprobes的jprobes和kretprobes. kprobes可以注入某个地址, jprobes用来注入某个函数入口, 而kretprobes则用来注入某个函数返回.
实现原理
Kprobes的实现主要利用了处理器的异常和单步执行特性. 以普通kprobes举例, 注册时它会复制一份被注入的指令, 并加入断点(例如x86的int 3), 当CPU执行到被注入的指令时就会陷入到Kprobes中, 此时Kprobes先运行钩子函数”pre_handler”, 然后单步执行被复制的指令, 并且由于是单步执行模式, 指令执行完毕后会再次触发异常而陷入到Kprobes中, 此时Kprobes会运行钩子函数”post_handler”并最终返回.
使用方法
通常情况下, Kprobes以内核模块的形式工作, 模块的init函数用来注册Kprobes, exit函数相应得用来注销, pre_handler和post_handler分别在单步执行被复制的指令前后运行, fault_handler则在单步执行发生异常时运行.
Kprobes模块写起来很简单, 下面是一个内核源码中的例子, 演示如何在每次do_fork()的时候打印选定寄存器中的内容.
#include <linux/kernel.h>
#include <linux/module.h>
#include <linux/kprobes.h>

/* For each probe you need to allocate a kprobe structure */
static struct kprobe kp = {
	.symbol_name	= "do_fork",
};

/* kprobe pre_handler: called just before the probed instruction is executed */
static int handler_pre(struct kprobe *p, struct pt_regs *regs)
{
	printk(KERN_INFO "pre_handler: p->addr = 0x%p, ip = %lx,"
			" flags = 0x%lx\n",
		p->addr, regs->ip, regs->flags);

	/* A dump_stack() here will give a stack backtrace */
	return 0;
}

/* kprobe post_handler: called after the probed instruction is executed */
static void handler_post(struct kprobe *p, struct pt_regs *regs,
				unsigned long flags)
{
	printk(KERN_INFO "post_handler: p->addr = 0x%p, flags = 0x%lx\n",
		p->addr, regs->flags);
}

/*
 * fault_handler: this is called if an exception is generated for any
 * instruction within the pre- or post-handler, or when Kprobes
 * single-steps the probed instruction.
 */
static int handler_fault(struct kprobe *p, struct pt_regs *regs, int trapnr)
{
	printk(KERN_INFO "fault_handler: p->addr = 0x%p, trap #%dn",
		p->addr, trapnr);
	/* Return 0 because we don't handle the fault. */
	return 0;
}

static int __init kprobe_init(void)
{
	int ret;
	kp.pre_handler = handler_pre;
	kp.post_handler = handler_post;
	kp.fault_handler = handler_fault;

	ret = register_kprobe(&kp);
	if (ret < 0) {
		printk(KERN_INFO "register_kprobe failed, returned %d\n", ret);
		return ret;
	}
	printk(KERN_INFO "Planted kprobe at %p\n", kp.addr);
	return 0;
}

static void __exit kprobe_exit(void)
{
	unregister_kprobe(&kp);
	printk(KERN_INFO "kprobe at %p unregistered\n", kp.addr);
}

module_init(kprobe_init)
module_exit(kprobe_exit)
MODULE_LICENSE("GPL");
这只是一个简单的打印示例, Kprobes还可以修改被注入函数的上下文, 如内核数据结构和寄存器, 并且都是在运行时动态修改, 多么美好!
ref:
1, https://lwn.net/Articles/132196/
2, https://www.kernel.org/doc/Documentation/kprobes.txt
3, http://www.ibm.com/developerworks/library/l-kprobes/index.html
Dec 28, 2012
内核中的编译器屏障rep_nop()
最近在看Linux内核中mutex_lock()和spin_lock()实现, 发现一个很有意思的函数调用: rep_nop()
/* REP NOP (PAUSE) is a good thing to insert into busy-wait loops. */
static inline void rep_nop(void)
{
	asm volatile("rep; nop" ::: "memory");
}
汇编指令rep的本意是重复执行rep后的指令直到ecx寄存器中的值变成0为止. 但是这里为什么要重复nop呢? 于是反汇编, 发现rep;nop其实是被翻译成了pause指令.
以下摘自Intel软件开发者手册第二卷第四章(下载地址):
Improves the performance of spin-wait loops. When executing a “spin-wait loop,” processors will suffer a severe performance penalty when exiting the loop because it detects a possible memory order violation. The PAUSE instruction provides a hint to the processor that the code sequence is a spin-wait loop. The processor uses this hint to avoid the memory order violation in most situations, which greatly improves processor performance. For this reason, it is recommended that a PAUSE instruction be placed in all spin-wait loops.
An additional function of the PAUSE instruction is to reduce the power consumed by a processor while executing a spin loop. A processor can execute a spin-wait loop extremely quickly, causing the processor to consume a lot of power while it waits for the resource it is spinning on to become available. Inserting a pause instruction in a spin-wait loop greatly reduces the processor’s power consumption.
This instruction was introduced in the Pentium 4 processors, but is backward compatible with all IA-32 processors. In earlier IA-32 processors, the PAUSE instruction operates like a NOP instruction. The Pentium 4 and Intel Xeon processors implement the PAUSE instruction as a delay. The delay is finite and can be zero for some processors. This instruction does not change the architectural state of the processor (that is, it performs essentially a delaying no-op operation).
This instruction’s operation is the same in non-64-bit modes and 64-bit mode.
简单说, Intel推荐在spin-wait loops中使用pause指令, 因为它既可以避免性能损失, 避开内存序列冲突, 还可以减少电源消耗, 并且不会有兼容性问题.
PS, 至于为什么mutex_lock()的实现也是spin-wait loop, 则是因为内核引入了spinning mutexes的特性, 详细信息在此: https://lkml.org/lkml/2009/1/14/393
Aug 24, 2012
Vim神级插件: EasyMotion
Vim的移动操作很强大, hjkl左下上右, wb按词移动, fF前后搜索等等, 方便, 快速. 但也有软肋, 跨越多行的精确跳转就相当不尽人意. 幸好, 有一款堪称神级表现的插件: EasyMotion.
简单说, 它提供了一组对应默认移动操作的键绑定, 能搜索并高亮所有可能的选择以供跳转, 类似Vimperator里链接跳转的方式, 效果相当棒, 就像下面这样(via YouTube):
总之, 强烈推荐! 具体说明和下载见项目地址: https://github.com/Lokaltog/vim-easymotion/
Jul 8, 2012
Linux在x86-64下的虚拟内存布局
普通x86架构下的Linux内存布局大家应该都很清楚了. 物理内存分为ZONE_DMA, ZONE_NORMAL和ZONE_HIGHMEM三个区, 虚拟内存则一般是0-3G为用户空间, 3G-(4G-1)为内核空间. 那么, x86-64架构下呢?
有多大
首先, 目前大部分的操作系统和应用程序并不需要16EB( 2^64 )如此巨大的地址空间, 实现64位长的地址只会增加系统的复杂度和地址转换的成本, 带不来任何好处. 所以目前的x86-64架构CPU都遵循AMD的Canonical form, 即只有虚拟地址的最低48位才会在地址转换时被使用, 且任何虚拟地址的48位至63位必须与47位一致(sign extension). 也就是说, 总的虚拟地址空间为256TB( 2^48 ).
如何布局
然后, 在这256TB的虚拟内存空间中, 0000000000000000 - 00007fffffffffff(128TB)为用户空间, ffff800000000000 - ffffffffffffffff(128TB)为内核空间. 这里需要注意的是, 内核空间中有很多空洞, 越过第一个空洞后, ffff880000000000 - ffffc7ffffffffff(64TB)才是直接映射物理内存的区域, 也就是说默认的PAGE_OFFSET为ffff880000000000. 从这里我们也可以看出, 这么大的直接映射区域足够映射所有的物理内存, 所以目前x86-64架构下是不存在高端内存, 也就是ZONE_HIGHMEM这个区域的(参考这篇).
如何映射
64位寻址模式是PAE的扩展. 页大小支持PAE所支持的4K和2M, 以及独有的1G. 页表分为4级, 不但扩展了PAE的Page-Directory Pointer Table, 还添加了一个Page-Map Level 4(PML4)映射表. 巧妙之处在于, 这个表不但可以通过扩展来支持以后的完整64位地址空间, 也兼容很有可能出现的第5级页表.
ref:
1, https://en.wikipedia.org/wiki/X86-64
2, https://en.wikipedia.org/wiki/Physical_Address_Extension
3, http://lxr.linux.no/#linux+v3.4/Documentation/x86/x86_64/mm.txt
May 26, 2012
Gràcies, Pep
四年十四冠. 感谢你, 瓜迪奥拉, 感谢你带给我那么多的快乐.
